SMH Guide: Changing an SMH NPU Filter
|
We hope that you find this simple illustrative guide to the most common NPU maintenance task useful.
If you experience any difficulties, or have any queries about using an SMH Negative Pressure Unit, please don't hesitate to get in touch via the contact page and we'll connect you to a service engineer. |
WARNING: This procedure should only be carried out by qualified personnel.
Personal Protective Equipment and Respiratory Protection should be worn at all times throughout the following procedure.
A Decontamination Shower Unit should also be available for use by the operative.
The steps outlined below should be carried out within a sealed enclosure, under negative pressure.
|
|
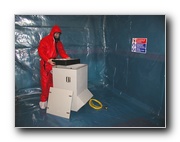
Step 1: Removing the front cover plate
The Negative Pressure Unit that you are working on, should be disconnected from its power supply.
Within a sealed enclosure, under negative pressure, disconnect the unit from its power supply.
With the power disconnected, unfasten the 4 over center clips, to remove the front cover plate.
|
|
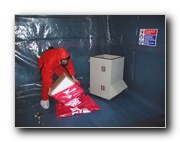
Step 2: Removing pre-filter
Once the front cover plate has been removed, you will be able to access the pre-filter, in order to remove it. The Pre filter should already be sealed in with PCL tape. Remove the PCL tape and then take out the pre filter. |
|
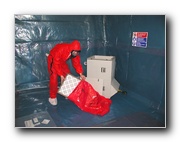 |
Step 3: Bag and seal the pre-filter
The filter should be first bagged in a red 'Asbestos Hazard' bag.
The bag should be sealed carefully with PCL tape, then washed down to remove any contamination on the outside of the bag. |
 |
Step 4: Removing retaining screws
Remove all of the screws on the edge of the push plate, on the filter end of the unit.
The push plate can now be removed. |
 |
Step 5: Removing the HEPA push plate
|
 |
Step 6: Removing the HEPA filter
Before removing the HEPA filter, spray it with Spray Adhesive to prevent any fibres from becoming airborne.
The unit can then be cleaned with a tak rag, which will remove unwanted material on the NPU.
The HEPA filter can now be removed. |
 |
Step 7: Bag the HEPA filter
Bag the HEPA filter in a red Asbestos Hazard bag and seal the bag with PCL tape.
Wash down the bag to remove any contamination on the outside of the bag. |
 |
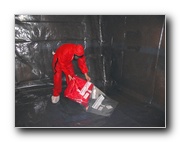
Step 8: Unit wash-down
Wash down the inside of the unit where the filters were situated. |
 |
Step 9: Push plate wash down
Wash down the push plate, to remove any contaminated material. |
 |
Step 10: Double-bag the pre-filter
Remove all of the bagged filters and the washed down unit into a quarantine area.
The pre-filters can now be bagged in clear 'Asbestos Waste' bags and sealed thoroughly with PCL tape and washed down. |
 |
Step 11: Double-bag the HEPA filter
The HEPA filters can now be bagged in clear 'Asbestos Waste' bags and sealed thoroughly with PCL tape, then washed down again. |
 |
Step 12: Double-bagged HEPA filter
The process is now complete and the waste can be removed for disposal in accordance with current legislation. |